2. User Guide
2.1. Settings
Once PlenoptiCam is ready for use (whether from source or as an app), you will be provided with a default parameter set. Start off varying these parameters as you like to see their impact on the light-field geometry. A scientific in-depth description of the parameters below is provided in the paper.
Parameter |
Description |
|---|---|
Light field image |
Path to plenoptic image file |
Calibration source |
Path to white image calibration file |
Metadata file |
Path to file where calibration properties are stored (contents are specific to PlenoptiCam) |
Calibration method |
Determine micro image center detection method. Use ‘grid-fit’ for regular MLAs, ‘vign_fit’ to combat severe micro image vignetting or ‘corn-fit’ to skip micro image sorting (experimental). |
Resampling method |
Determine alignment method for a consistent micro image sampling grid. Use ‘global’ for fast computation. |
Micro image patch size |
One-dimensional micro image size in pixels (your value may be reduced by a detected maximum) |
Refocusing range |
Numeric start (left) and end point (right) for the refocus parameter. |
Redo calibration |
Enforce re-calibration process |
De-Vignetting |
Combat vignetting (white calibration image division by default) |
Auto-Contrast |
Histogram alignment based on percentiles in luminance channel |
White balance |
Apply channel-wise normalization |
Auto-Saturation |
Histogram alignment based on percentiles in saturation channel |
Refocus refinement |
Enable sub-pixel precise refocusing in steps 1 divided by micro image size |
Scheimpflug focus |
Imitates tilted sensor focus with ‘horizontal’, ‘vertical’, just as upwards and downwards ‘skew’ |
Hex-Artifact removal |
Rectification of potential artifacts arising from hexagonal micro image arrangements (useful for local resampling). |
Depth map |
Disparity computation using depthy providing depth as a *.ply and *.pfm file. |
Remove output folder |
Entire folder gets removed for new process if checked |
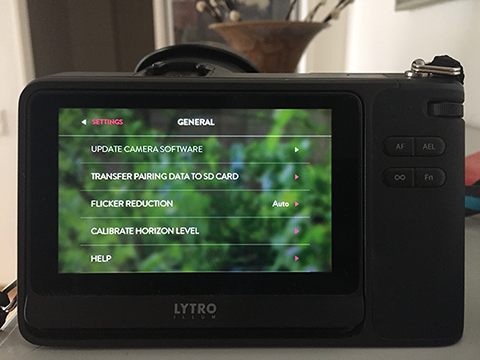
2.2. Using your own Lytro Illum
In order to acquire the tar-archive from your own Illum camera, use the following steps:
Go to SETTINGS => GENERAL in your camera’s menu
Press TRANSFER PAIRING DATA TO SD CARD
Copy the xxx.tar file to your desired calibration folder (Note: keep the original tar filename)
Point to the tar-file at calibration source using the Browse button (point to parent folder if Pick folder is checked)
Select your xxx.lfr file from the SD card using the Browse button at light field image
